Custom CSS & Javascript: Tips and Tricks – Part 1
June 5, 2019

New Enhancements 3.13
May 24, 2019
Newsletter Q2 2019
June 11, 2019Did you know?
That the look and layout of the web-to-print portals can be customized using CSS and Javascript?
This blog post will cover customizing field labels, adding custom links to your navigation and a trick to add rush fees to your products.
This blog post will cover customizing field labels, adding custom links to your navigation and a trick to add rush fees to your products.
Relabeling Fields
Most of the common requests we receive is to simply relabel a field so that the information needed is relayed better or if further instructions are needed.
Product Page
Notes
Using this Custom Javascript
function dmLoad(){
  $(".page-productdetails .form-group label:contains(Notes)").text("Notes / Details");
}
Will change this

To this

Upload File
Using this Custom Javascript
function dmLoad(){
  $(".page-productdetails .form-group label:contains(Upload your Files)").text("Upload your Files (PDF Preferred)");
}
Will change this

To this

Checkout Page
Shipping Notes
Using this Custom Javascript
function dmLoad(){
 $(".page-checkout .form-group label:contains(Shipping Notes)").text("Shipping Directions");
$('.page-checkout #txtShippingNotes').attr('placeholder', 'Please let us know how you would like this shipped');
}
Will change this

To this

Purchase Order Field
Using this Custom Javascript
function dmLoad(){
 $(".page-checkout .form-group label:contains(Purchase Order #)").text("Business Area/CostCentre/GL:");
$('.page-checkout #txtPONumber').attr('placeholder', 'Business Area/CostCentre/GL:');
}
Will change this

To this

Please use the custom function "function dmLoad() { }" as shown in these examples in lieu of the commonly used "function pageLoad { }". Only one pageLoad function can be present and we have one set in the back end.
Custom Links in Portal Navigation
We often get asked how to add custom links to the portal navigation. The purpose of this could be to direct the user to another website or link them to a resource.
Use this simple trick to add a custom link to your portal's navigation.

First, in your portal Settings, go to Pages > New. Add a page title and save the page. Add the page to your navigation
Now, in your portal right click your new page in the navigation and click "Inspect". Find the class for your new page.
This should be in the following format: "navigationdisplay-" + "page name".
Now, in your portal right click your new page in the navigation and click "Inspect". Find the class for your new page.
This should be in the following format: "navigationdisplay-" + "page name".
function dmLoad(){
$(".navigationdisplay-google a").attr("href", "https://google.com");
}
Add the above code to your Custom Javascript. Replace the class with the one found when you inspected your navigation link.
Adding Rush Fees and Hiding Order Due Options
Currently, DocketManager does not have the functionality to add fees to Order Due Options. While this is something we are looking into for future development, here is a trick to create your own Rush fees using Product Attributes and a bit of javaScript.
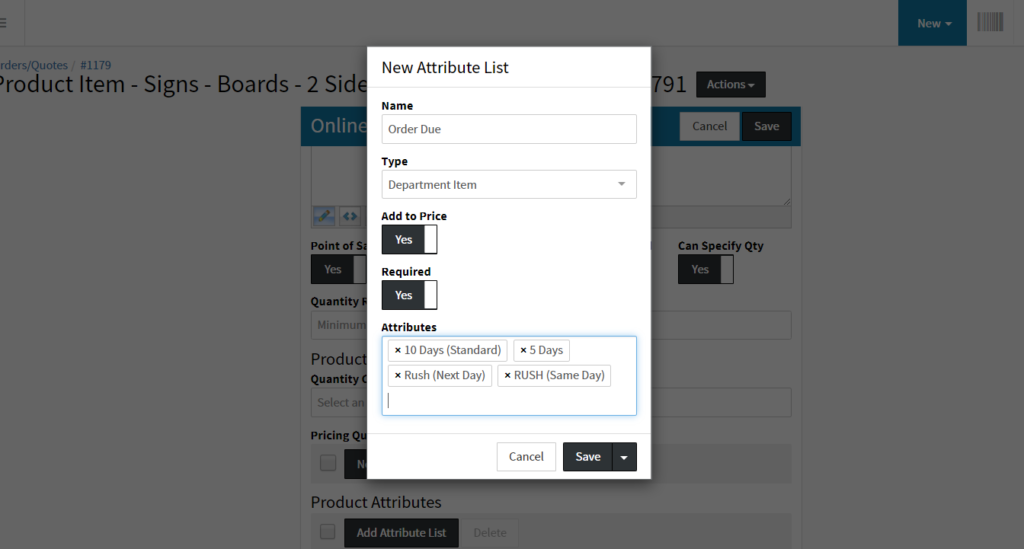
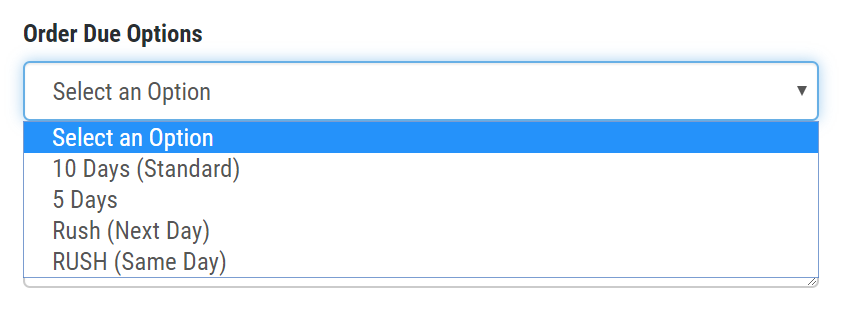
First, create department items for each of the order due options you would like the user to be able to select from. Assign pricing to Rush or other options that you would like to charge for. Be sure to turn on "Add to Price".
Please note: In order for your order to come into the MIS with the correct Order Due Date assigned, the Online Name for each of these department items must match the Online Name for the available Order Due Options EXACTLY.
Next, create a product attribute list on your products with these Department items. In order for the code to work, this Attribute list must be named "Order Due".
More information on this can be found here

Next, hide the existing order due options and have them auto-selected in the background by adding the following to your custom javaScript on the portal:
function dmLoad() {
    $(".product-orderdue-container").hide();
    $(".product-attribute-departmentitem-container:contains(Order Due)").change(function() {
        var duedate = $(this).find('.select2-selection__rendered').prop('title');
        $(".product-orderdue-container option").filter(function() {
            return $(this).text() == duedate;
        }).prop("selected", true);
    });
}
Also note: This will hide the Order Due Options on all product pages in your portal. To find out how to hide this on only products that you have added the proper attribute list to, visit this blog post


